こんにちは、エンジニアの遠藤です。
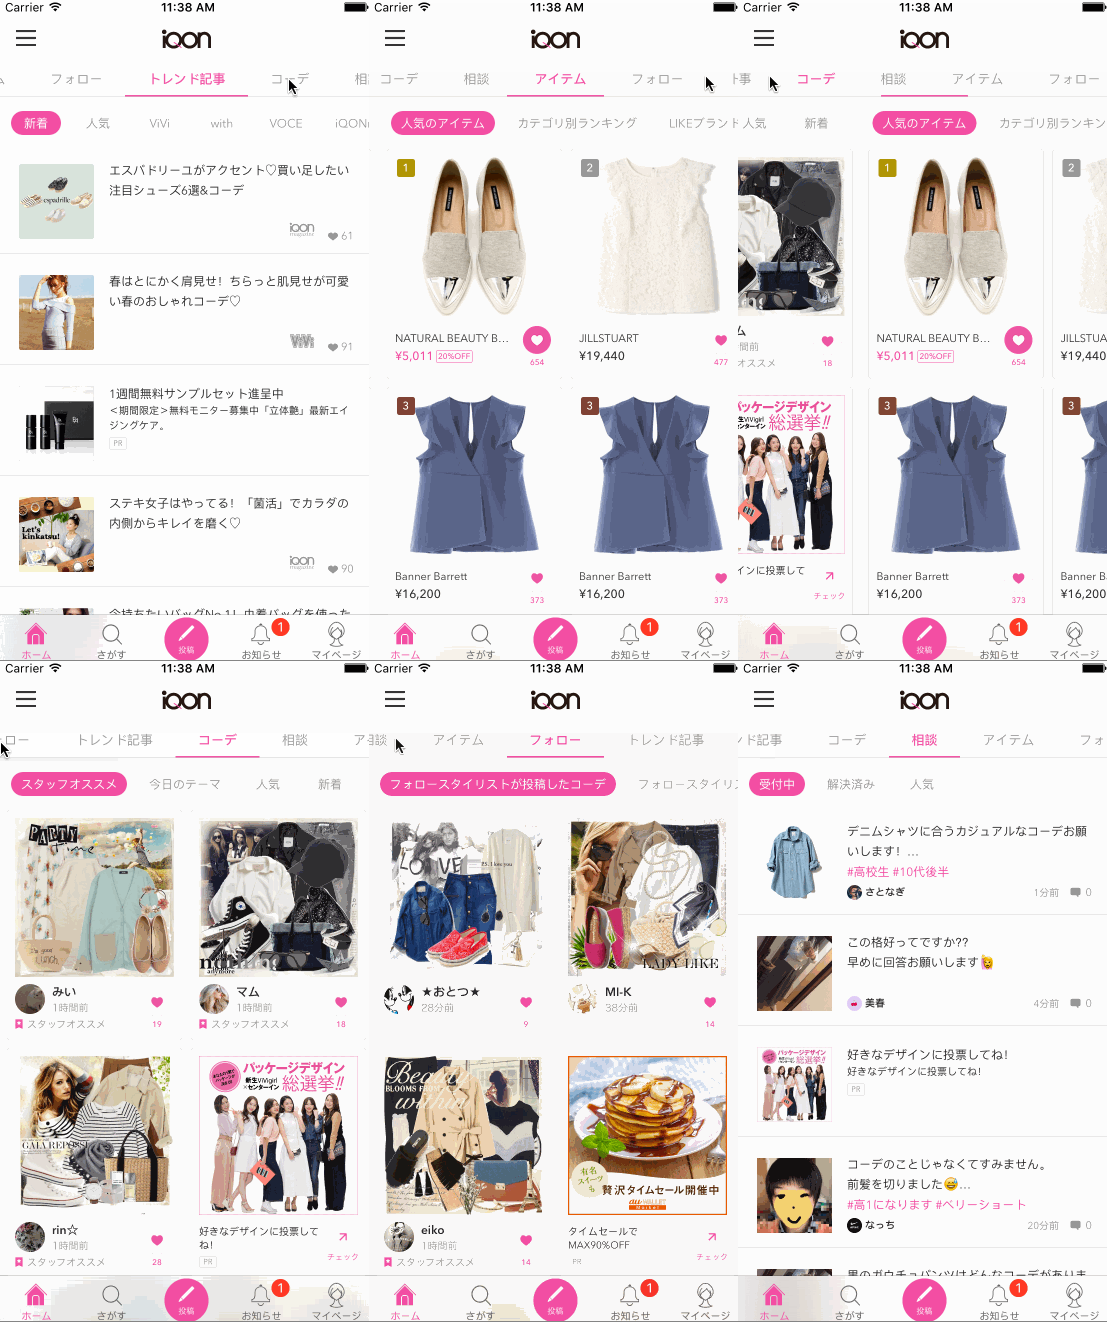
最近iQONアプリのホーム画面のデザインをリニューアルしました。
タブを使ったデザインにすることで、iQON内にある多くのコンテンツが見やすくなりました。

今回はこのタブ機能の実装についてざっくりと紹介しようと思います。 実装したものはライブラリーとしてGitHubに公開しているので、ぜひ使ってみてください!
機能
今回実装した機能は下記の3つです
1. スワイプでページを無限に表示切り替え
2. タブは無限スクロール
3. タブをタップしたらタップした項目のページを表示
実装について
1. スワイプでページを無限に表示切り替え

スワイプしたらページの表示を切り替えたいのでUIPageViewControllerを継承したTabPageViewControllerというクラスを実装しました。
今回は無限にページの表示切り替えをしたいのでUIPageViewControllerDataSourceのViewControllerを返すメソッドで調整をします。
// TabPageViewController.swift

class TabPageViewController: UIPageViewController {

    var pageViewControllers: [UIViewController] = []

    private var beforeIndex: Int = 0
    private var currentIndex: Int? {
        guard let viewController = viewControllers?.first else {
            return nil
        }
        return pageViewControllers.indexOf(viewController)
    }

    override func viewDidLoad() {
        super.viewDidLoad()

        // 初期化処理など

        dataSource = self
        delegate = self

        setViewControllers(
            [pageViewControllers[0]],
            direction: .Forward,
            animated: false,
            completion: nil)
    }
}


// MARK: - UIPageViewControllerDataSource

extension InfinityTabPageViewController: UIPageViewControllerDataSource {

    private func nextViewController(viewController: UIViewController, isAfter: Bool) -> UIViewController? {
        guard var index = pageViewControllers.indexOf(viewController) else {
            return nil
        }

        if isAfter {
            index++
        } else {
            index--
        }

        if index < 0 {
            index = pageViewControllers.count - 1
        } else if index == pageViewControllers.count {
            index = 0
        }

        if index >= 0 && index < pageViewControllers.count {
            return pageViewControllers[index]
        }
        return nil
    }

    func pageViewController(pageViewController: UIPageViewController, viewControllerAfterViewController viewController: UIViewController) -> UIViewController? {
        return nextViewController(viewController, isAfter: true)
    }

    func pageViewController(pageViewController: UIPageViewController, viewControllerBeforeViewController viewController: UIViewController) -> UIViewController? {
        return nextViewController(viewController, isAfter: false)
    }
}
2. タブは無限スクロール

タブは無限でスクロールできるように、表示したい要素数の3倍を用意してスクロール位置がしきい値を超えたら中央に戻します。

今回はUICollectionViewをつかってTabViewとして実装しています。
UICollectionViewではなくUIScrollViewでも実装はできるのですが、表示したい要素が増えた時にメモリを圧迫してしまうので採用しませんでした。
// TabView.swift

class InfinityTabView: UIView {

    private var pageTabItemsWidth: CGFloat = 0.0


    // MARK: - UICollectionViewDataSource

    func collectionView(collectionView: UICollectionView, numberOfItemsInSection section: Int) -> Int {
        return pageTabItemsCount * 3 // 表示したい要素数の3倍を返す
    }

    func collectionView(collectionView: UICollectionView, cellForItemAtIndexPath indexPath: NSIndexPath) -> UICollectionViewCell {
        // Cellを返す処理
    }


    // MARK: - UIScrollViewDelegate

    func scrollViewDidScroll(scrollView: UIScrollView) {

        if pageTabItemsWidth == 0.0 {
            pageTabItemsWidth = floor(scrollView.contentSize.width / 3.0) // 表示したい要素群のwidthを計算
        }

        if (scrollView.contentOffset.x <= 0.0) || (scrollView.contentOffset.x > pageTabItemsWidth * 2.0) { // スクロールした位置がしきい値を超えたら中央に戻す
            scrollView.contentOffset.x = pageTabItemsWidth
        }
    }
}
作成したTabViewをTabPageViewControllerに表示します。
// TabPageViewController.swift

class TabPageViewController: UIPageViewController {

    var pageViewControllers: [UIViewController] = []
    var pageTabItems: [String] = []

    override func viewDidLoad() {
        super.viewDidLoad()

        // 初期化処理など

        let tabView = TabView()
        tabView.translatesAutoresizingMaskIntoConstraints = false

        let height = NSLayoutConstraint(item: tabView,
            attribute: .Height,
            relatedBy: .Equal,
            toItem: nil,
            attribute: .Height,
            multiplier: 1.0,
            constant: TabView.tabViewHeight)

        tabView.addConstraint(height)
        view.addSubview(tabView)

        let top = NSLayoutConstraint(item: tabView,
            attribute: .Top,
            relatedBy: .Equal,
            toItem: topLayoutGuide,
            attribute: .Bottom,
            multiplier:1.0,
            constant: 0.0)

        let left = NSLayoutConstraint(item: tabView,
            attribute: .Leading,
            relatedBy: .Equal,
            toItem: view,
            attribute: .Leading,
            multiplier: 1.0,
            constant: 0.0)

        let right = NSLayoutConstraint(item: view,
            attribute: .Trailing,
            relatedBy: .Equal,
            toItem: tabView,
            attribute: .Trailing,
            multiplier: 1.0,
            constant: 0.0)

        view.addConstraints([top, left, right])

        tabView.pageTabItems = pageTabItems
    }
}
3. タブをタップしたらタップした項目のページを表示

iQONではUICollectionViewCellにUIButtonをのせたTabCollectionCellを実装しています。
// TabCollectionCell.swift

class InfinityTabCollectionCell: UICollectionViewCell {

    var pageItemPressedBlock: ((index: Int, direction: UIPageViewControllerNavigationDirection) -> Void)?
    var pageTabItemButtonPressedBlock: (Void -> Void)?

    override func awakeFromNib() {
        super.awakeFromNib()

        // 初期化処理など
    }


    // MARK: - IBAction

    @IBAction private func pageItemButtonTouchUpInside(button: UIButton) {
        pageTabItemButtonPressedBlock?()
    }
}
作成したCellをTabViewのUICollectionViewに表示していきます。
// TabView.swift

class TabView: UIView {
    var pageItemPressedBlock: ((index: Int, direction: UIPageViewControllerNavigationDirection) -> Void)?
    var pageTabItems: [String] = []
}

// MARK: - UICollectionViewDataSource

extension TabView: UICollectionViewDataSource {

    func collectionView(collectionView: UICollectionView, cellForItemAtIndexPath indexPath: NSIndexPath) -> UICollectionViewCell {
        let cell = collectionView.dequeueReusableCellWithReuseIdentifier(InfinityTabCollectionCell.cellIdentifier(), forIndexPath: indexPath) as! InfinityTabCollectionCell
        configureCell(cell, indexPath: indexPath)
        return cell
    }

    private func configureCell(cell: InfinityTabCollectionCell, indexPath: NSIndexPath) {
         // 無限スクロールのために要素数を3倍用意しているので要素群のindexを計算します
        let fixedIndex = indexPath.item % pageTabItemsCount
        cell.title = pageTabItems[fixedIndex]
        cell.isCurrent = fixedIndex == (currentIndex % pageTabItemsCount)
        cell.pageTabItemButtonPressedBlock = { [weak self, weak cell] in
            self?.pagingViewController(fixedIndex: fixedIndex, nextIndex: indexPath.item)
        }
    }

    private func pagingViewController(fixedIndex fixedIndex: Int, nextIndex: Int) {
        // 遷移する先のページのindexをみてページ送りの方向を決めてからページの表示を切り替えます
        var direction: UIPageViewControllerNavigationDirection = .Forward
        if (nextIndex < pageTabItemsCount) || (nextIndex < currentIndex) {
            direction = .Reverse
        }
        pageItemPressedBlock?(index: fixedIndex, direction: direction)
    }
}
TabPageViewControllerにcellのタップ時の処理を書きます。
// TabPageViewController.swift

class TabPageViewController: UIPageViewController {

    var pageViewControllers: [UIViewController] = []
    var pageTabItems: [String] = []

    override func viewDidLoad() {
        super.viewDidLoad()

        // TabViewの初期化処理など

        tabView.pageItemPressedBlock = { [weak self] (index: Int, direction: UIPageViewControllerNavigationDirection) in
            self?.displayControllerWithIndex(index, direction: direction, animated: true)
        }
    }

    func displayControllerWithIndex(index: Int, direction: UIPageViewControllerNavigationDirection, animated: Bool) {
        let nextViewControllers: [UIViewController] = [pageViewControllers[index]]

        setViewControllers(
            nextViewControllers,
            direction: direction,
            animated: animated,
            completion: completion)
    }
}
そのほか
機能については上記3つで実装できます。 上記実装のほかにページの表示を切り替え時のタブの位置を移動させるように実装しています。
大まかな実装としては、
UIPageViewControllerのsubviewsのscrollViewを取得してdelegateをselfに設定します。
スワイプした時のscrollViewのdelegate内で処理を書いていきます。
// TabPageViewController.swift

class TabPageViewController: UIPageViewController {

    override func viewDidLoad() {
        super.viewDidLoad()

        //  初期化処理など

        let scrollView = view.subviews.flatMap { $0 as? UIScrollView }.first
        scrollView?.delegate = self
    }
}

// MARK: - UIScrollViewDelegate

extension TabPageViewController: UIScrollViewDelegate {

    func scrollViewDidScroll(scrollView: UIScrollView) {
        //  ページを切り替えながらタブの位置を移動させる
    }
}
詳しい実装については説明が長くなってしまうので公開しているコードを見てください。
まとめ
今回はUIPageViewControllerをつかって無限スクロールできるタブUIの実装について紹介しました。
ページの表示を切り替えるだけなどの機能だけならば、比較的シンプルに実装をすることができました。
しかし、ページの表示を切り替えながらタブの位置を移動させようとすると、かなりコード量が増えて苦労しました。
今後同じようなUIを実装しようと考えている方はぜひライブラリーを使ってみてください。
改善要望については、PRやissueをお待ちしています。
GitHub - EndouMari/TabPageViewController: Paging view controller and scroll tab view
最後に
VASILYでは、一緒にiQONのアプリを開発してくれる仲間を募集しています。少しでもご興味のある方はぜひご応募よろしくお願いいたします。