こんにちは。フロントエンドエンジニアの遠藤です。
皆さん、ConstraintLayoutを使用していますか? 弊社では最近、ほとんどのレイアウトをConstraintLayoutを使用して実装しています。 今回はConstraintLayoutを使用してレイアウトを組んだ際に便利だなと思ったポイントや難しくてはまったことについて紹介したいと思います。
今回はConstraintLayoutを使用したレイアウトの組み方について注目するので、基本的な使い方については説明しません。
ConstraintLayoutの基本的な使い方は下記の記事が分かりやすくておすすめです。
Google Developer
Yukiの枝折: ConstraintLayout
実用例
今回はConstraintLayout1.1.0-beta5を使用しています。 サンプルコードはGitHubにあげてあります。 github.com
1. Chainを利用した複数要素の中央寄せ
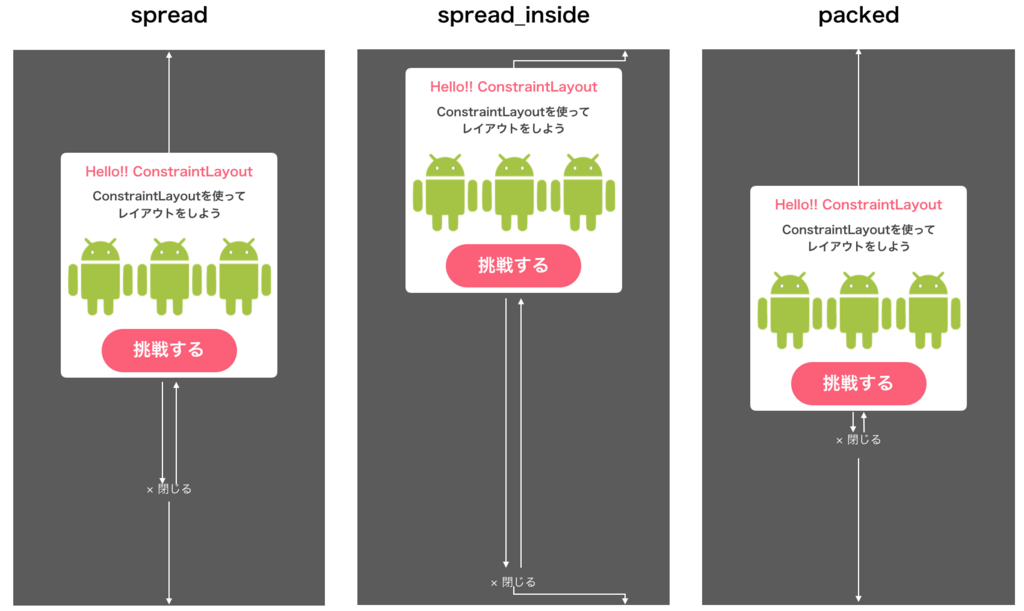
例えば次のようなデザインを実装することを考えます。
 このデザインは、コンテンツと閉じるボタンを合わせて中央寄せする必要があります。
今まではrootにFrameLayout、中央のコンテンツにRelativeLayoutを使用してレイアウトをネストすることで実装していました。
<FrameLayout xmlns:android="http://schemas.android.com/apk/res/android"
    android:layout_width="match_parent"
    android:layout_height="match_parent"
    android:background="@color/background_color_dialog">

    <RelativeLayout
        android:layout_width="wrap_content"
        android:layout_height="wrap_content"
        android:layout_gravity="center">

        <View
            android:id="@+id/background"
            android:layout_width="240dp"
            android:layout_height="250dp"
            android:background="@drawable/background_white_corner_radius" />

        <TextView
            android:id="@+id/title"
            android:layout_width="wrap_content"
            android:layout_height="wrap_content"
            android:layout_alignTop="@id/background"
            android:layout_centerHorizontal="true"
            android:layout_marginTop="20dp"
            android:text="@string/sample_1_title"
            android:textColor="@color/colorAccent"
            android:textSize="15sp"
            android:textStyle="bold" />

            ・・・

        <TextView
            android:id="@+id/dismissLink"
            android:layout_width="wrap_content"
            android:layout_height="wrap_content"
            android:layout_below="@id/background"
            android:layout_centerHorizontal="true"
            android:layout_marginTop="20dp"
            android:text="@string/sample_1_dismiss"
            android:textColor="@android:color/white" />

    </RelativeLayout>

</FrameLayout>
しかし、ConstraintLayoutのchainという仕組みを使うことでレイアウトをネストすることなく2つの要素を中央に配置することが出来ます。
<android.support.constraint.ConstraintLayout xmlns:android="http://schemas.android.com/apk/res/android"
    xmlns:app="http://schemas.android.com/apk/res-auto"
    android:layout_width="match_parent"
    android:layout_height="match_parent"
    android:background="@color/background_color_dialog">

    <View
        android:id="@+id/background"
        android:layout_width="240dp"
        android:layout_height="250dp"
        android:background="@drawable/background_white_corner_radius"
        app:layout_constraintBottom_toBottomOf="parent"
        app:layout_constraintLeft_toLeftOf="parent"
        app:layout_constraintRight_toRightOf="parent"
        app:layout_constraintTop_toTopOf="parent"
        app:layout_constraintVertical_chainStyle="packed" />

    <TextView
        android:id="@+id/title"
        android:layout_width="wrap_content"
        android:layout_height="wrap_content"
        android:layout_marginTop="20dp"
        android:text="@string/sample_1_title"
        android:textColor="@color/colorAccent"
        android:textSize="15sp"
        android:textStyle="bold"
        app:layout_constraintLeft_toLeftOf="@id/background"
        app:layout_constraintRight_toRightOf="@id/background"
        app:layout_constraintTop_toTopOf="@id/background" />

        ・・・

    <TextView
        android:id="@+id/dismissLink"
        android:layout_width="wrap_content"
        android:layout_height="wrap_content"
        android:layout_marginTop="20dp"
        android:text="@string/sample_1_dismiss"
        android:textColor="@android:color/white"
        app:layout_constraintBottom_toBottomOf="parent"
        app:layout_constraintLeft_toLeftOf="parent"
        app:layout_constraintRight_toRightOf="parent"
        app:layout_constraintTop_toBottomOf="@id/background" />

</android.support.constraint.ConstraintLayout>
ConstraintLayoutのChainは制約を要素どうし双方向に設定することでグループのように扱えます。
 Chainにはいくつか種類があり、今回はグループ化した要素を詰めて表示したいため
packedを使用しています。詳しくはこちらをご参照下さい。
2. ネガティブマージンの設定方法

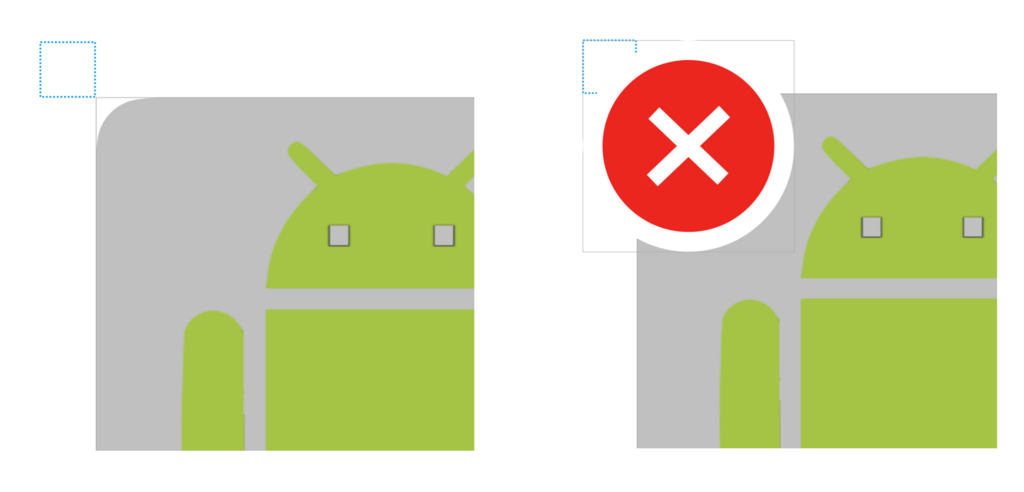
このような重なっているデザインを実装する際に、四角枠の左上にバツボタンを配置してネガティブマージンを使用してデザインを実装する方法を思い浮かべるのではないでしょうか。
しかし、ConstraintLayoutでlayout_marginTopに-20dpを設定しても反映されません。
ConstraintLayoutでネガティブマージンを表現するには少し工夫が必要になります。
こちらの記事でGoogleのデベロッパーがSpaceを使用する方法を紹介しています。
今回の例を実装するには、四角枠の左上側にSpaceの右下側を配置するようにします。
そのSpaceの左上側にバツボタンの左上側を配置すると表現できます。

<android.support.constraint.ConstraintLayout xmlns:android="http://schemas.android.com/apk/res/android"
    xmlns:app="http://schemas.android.com/apk/res-auto"
    android:layout_width="match_parent"
    android:layout_height="match_parent">

    <View
        android:id="@+id/contentsBackground"
        android:layout_width="100dp"
        android:layout_height="100dp"
        android:background="@drawable/background_gray_corner_radius"
        app:layout_constraintBottom_toBottomOf="parent"
        app:layout_constraintLeft_toLeftOf="parent"
        app:layout_constraintRight_toRightOf="parent"
        app:layout_constraintTop_toTopOf="parent" />

    <android.support.v7.widget.AppCompatImageView
        android:id="@+id/android"
        android:layout_width="80dp"
        android:layout_height="80dp"
        app:layout_constraintBottom_toBottomOf="@id/contentsBackground"
        app:layout_constraintLeft_toLeftOf="@id/contentsBackground"
        app:layout_constraintRight_toRightOf="@id/contentsBackground"
        app:layout_constraintTop_toTopOf="@id/contentsBackground"
        app:srcCompat="@drawable/ic_android" />

    <Space
        android:id="@+id/negativeMargin"
        android:layout_width="15dp"
        android:layout_height="15dp"
        app:layout_constraintBottom_toTopOf="@id/contentsBackground"
        app:layout_constraintRight_toLeftOf="@id/contentsBackground" />

    <android.support.v7.widget.AppCompatImageView
        android:layout_width="40dp"
        android:layout_height="40dp"
        app:layout_constraintLeft_toLeftOf="@id/negativeMargin"
        app:layout_constraintTop_toTopOf="@id/negativeMargin"
        app:srcCompat="@drawable/ic_close_vector" />

</android.support.constraint.ConstraintLayout>
3. 文字の省略とレイアウト寄せ
リストで文章を表示するときに全てを表示せずに省略して表示するデザインは多いです。
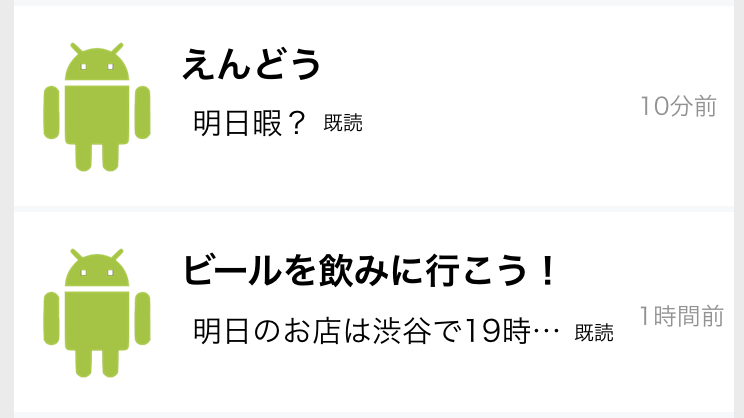
今回、以下のような文章の横にテキストを配置しているレイアウトを組むのが難しくとてもはまってしまいました。

文章を省略する
文章を省略するのにellipsizeを設定しますが、ConstraintLayoutを使用している場合それだけでは省略されません。
layout_constrainedWidthにtrueを設定する必要があります。
これを設定することで、きちんと文章が省略されるようになります。
文章と「既読」ラベルを左に寄せて表示させる
順を追って説明します。
文章と、「既読」ラベル、日付の要素をchainしてpackedを設定してしまうと以下の図のように表示されます。
 文章と「既読」ラベルを左寄せで表示させたいので、日付との双方向の制約を外してChianしないようにします。
しかし、文章が長いときに日付とかぶらないように「既読」ラベルを日付の左側に配置するという制約は残しておきます。
これで、文章と「既読」ラベルだけがグループになります。
 これだけは左寄せにならないのでbiasを設定します。
これで文章と「既読」ラベルが左に寄って表示されるようになります。
 以下、上記のデザインのxmlです。
<android.support.constraint.ConstraintLayout xmlns:android="http://schemas.android.com/apk/res/android"
    xmlns:app="http://schemas.android.com/apk/res-auto"
    android:layout_width="match_parent"
    android:layout_height="100dp">

    <android.support.v7.widget.AppCompatImageView
        android:id="@+id/imageView"
        android:layout_width="80dp"
        android:layout_height="80dp"
        android:layout_marginStart="8dp"
        app:layout_constraintBottom_toBottomOf="parent"
        app:layout_constraintStart_toStartOf="parent"
        app:layout_constraintTop_toTopOf="parent"
        app:srcCompat="@drawable/ic_android" />

    <TextView
        android:id="@+id/nameLabel"
        android:layout_width="wrap_content"
        android:layout_height="wrap_content"
        android:layout_marginStart="16dp"
        android:ellipsize="end"
        android:lines="1"
        android:scrollHorizontally="true"
        android:textColor="@color/text_color_black"
        android:textSize="18sp"
        android:textStyle="bold"
        app:layout_constrainedWidth="true"
        app:layout_constraintEnd_toStartOf="@id/dateLabel"
        app:layout_constraintHorizontal_bias="0"
        app:layout_constraintStart_toEndOf="@id/imageView"
        app:layout_constraintTop_toTopOf="@id/imageView" />

    <TextView
        android:id="@+id/dateLabel"
        android:layout_width="wrap_content"
        android:layout_height="wrap_content"
        android:layout_marginEnd="16dp"
        android:textColor="@color/text_color_gray"
        android:textSize="15sp"
        app:layout_constraintBottom_toBottomOf="parent"
        app:layout_constraintEnd_toEndOf="parent"
        app:layout_constraintTop_toTopOf="parent" />

    <TextView
        android:id="@+id/messageLabel"
        android:layout_width="wrap_content"
        android:layout_height="wrap_content"
        android:layout_marginEnd="8dp"
        android:layout_marginStart="16dp"
        android:layout_marginTop="8dp"
        android:ellipsize="end"
        android:lines="1"
        android:textColor="@color/text_color_black"
        android:textSize="15sp"
        app:layout_constrainedWidth="true"
        app:layout_constraintEnd_toStartOf="@id/readLabel"
        app:layout_constraintHorizontal_bias="0"
        app:layout_constraintHorizontal_chainStyle="packed"
        app:layout_constraintStart_toEndOf="@id/imageView"
        app:layout_constraintTop_toBottomOf="@id/nameLabel" />

    <TextView
        android:id="@+id/readLabel"
        android:layout_width="wrap_content"
        android:layout_height="wrap_content"
        android:layout_marginEnd="8dp"
        android:layout_marginStart="2dp"
        android:ellipsize="end"
        android:lines="1"
        android:scrollHorizontally="true"
        android:text="@string/sample_2_read_label"
        android:textColor="@color/text_color_gray"
        android:textSize="12sp"
        app:layout_constraintBaseline_toBaselineOf="@id/messageLabel"
        app:layout_constraintEnd_toStartOf="@id/dateLabel"
        app:layout_constraintStart_toEndOf="@id/messageLabel" />

</android.support.constraint.ConstraintLayout>
まとめ
ConstraintLayoutを使用したレイアウトの組み方の実用例でした。 ConstraintLayoutは表現力が高く、柔軟に要素を配置することができるのですごく便利です。 レイアウトを組む際に参考として見ていただけると幸いです。
最後に
VASILYではデザイン実装にこだわりを持っているエンジニアを募集しています。 少しでも興味がある方は以下のリンクからお申し込みください。