はじめに
こんにちは。WEAR iOSチームの坂倉 (@isloop) です。
この間リリースされたiPadOSはかなり盛りだくさんの内容でしたね。
個人的には、1つのアプリで複数のウィンドウを開ける「Multiple Windows」機能が一番気になりました。
この記事では、WWDC 2019のセッション Introducing Multiple Windows on iPad と Architecting Your App for Multiple Windows を参考にしながらWEARへの仮実装を通して「Multiple Windows」を解説します。
解説
条件
Multiple Windowsは以下の条件で動作します。
- Xcode 11以降に含まれるiOS 13.0 SDK以上でビルドされたアプリ
- iPadOSがインストールされているiPad
Supporting Multiple Windows on iPad | Apple Developer Documentation
WEARにMultiple Windows機能を実装する
今回、WEARに以下の5つのMultiple Windowsの機能を実装してみました。
- 複数のウィンドウを開く
- ドラッグ&ドロップで新しいウィンドウを開く
- ロングタップからのコンテキストメニューから新しいウィンドウを開く
- 以前開いていたすべてのウィンドウの状態を復帰させる
- 現在開いているすべてのウィンドウのUIを更新する
これらすべてを実装するのはなかなか大変そうに思えますが、意外に少ないコードで実装できます。
その1. 複数のウィンドウを開けるように、Xcode 11以前で作ったアプリをMultiple Windowsに対応させる
実は、Xcode 11で作ったプロジェクトならば設定画面の「Supports multiple windows」にチェックを入れるだけで対応できます。

しかしながら、Xcode 10以前に作られたプロジェクトの場合はコードを足さないと対応できません。
WEARは現在、Xcode 10.3で開発しているのでコードを足す必要がありました。
と言ってもほんの少しのコードで対応できます。以下の3つを足すだけです。
(1)AppDelegate.swiftに以下のメソッドを追加します。
func application(_ application: UIApplication, configurationForConnecting connectingSceneSession: UISceneSession, options: UIScene.ConnectionOptions) -> UISceneConfiguration {
  return UISceneConfiguration(name: "Default Configuration", sessionRole: connectingSceneSession.role)
}
(2)Info.plistに以下のコードを追加します。
<key>UIApplicationSceneManifest</key>
<dict>
  <key>UIApplicationSupportsMultipleScenes</key>
  <true/>
  <key>UISceneConfigurations</key>
  <dict>
    <key>UIWindowSceneSessionRoleApplication</key>
    <array>
      <dict>
        <key>UISceneConfigurationName</key>
        <string>Default Configuration</string>
        <key>UISceneDelegateClassName</key>
        <string>$(PRODUCT_MODULE_NAME).SceneDelegate</string>
        <key>UISceneStoryboardFile</key>
        <string>BrowserViewController</string> // 最初に表示するStoryboard名
      </dict>
    </array>
  </dict>
</dict>
(3)SceneDelegate.swiftを新規作成して下のコードをそのまま貼り付けます。
import UIKit

class SceneDelegate: UIResponder, UIWindowSceneDelegate {
  var window: UIWindow?

  func scene(_ scene: UIScene, willConnectTo session: UISceneSession, options connectionOptions: UIScene.ConnectionOptions) {
      guard let _ = (scene as? UIWindowScene) else { return }
  }
}
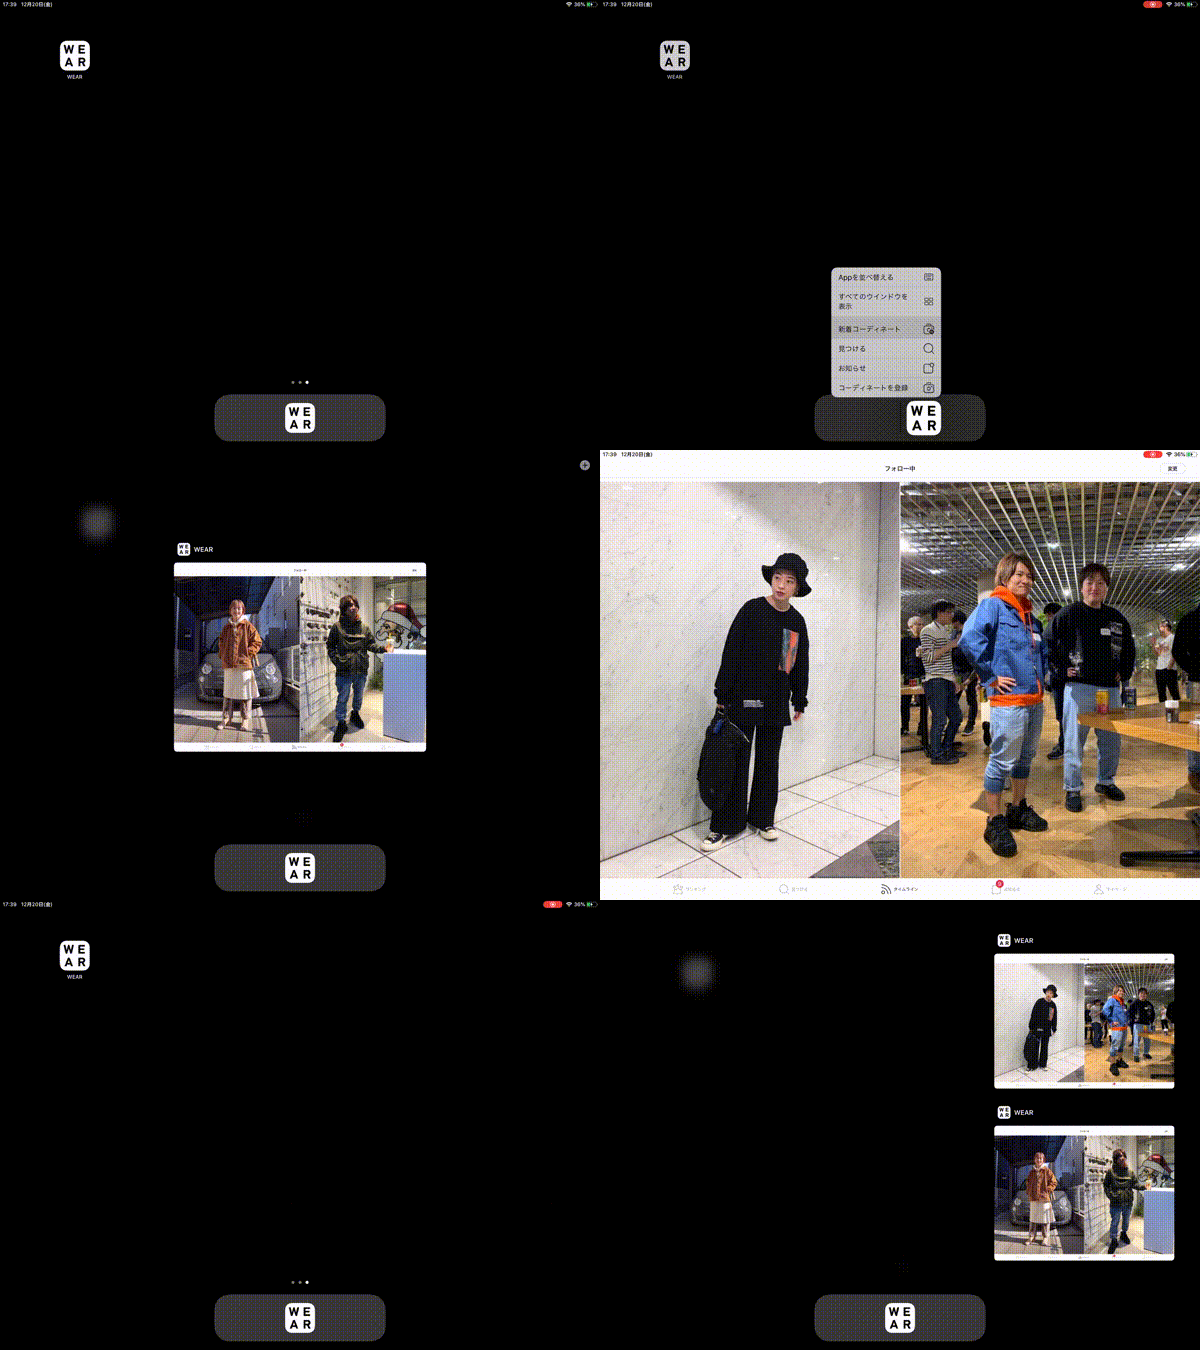
これだけです。アプリを起動し「Dockのアイコンを長押し」してみましょう。
これまで表示されなかった項目「すべてのウィンドウを表示」が現れるようになり、1つのアプリで複数のウィンドウを開くことができます。

ちなみに、これまでUIApplicationDelegateで使用していたライフサイクルメソッドは使えなくなります。そのあたりの処理はUISceneDelegateのsceneDidBecomeActive / sceneWillResignActive / sceneWillEnterForegroundなどに移管する必要があります。
その2. ドラッグ&ドロップで新しいウィンドウを開けるようにする
次は、「ドラッグ&ドロップで新しいウィンドウを開く」を実装してみましょう。

流れとしては、NSUserActivityの中へ新しいウィンドウに必要な情報を入れて生成しUIDragInteractionDelegateを利用してSceneDelegateの「scene(_:willConnectTo:options:)」を呼び出し、新しいウィンドウを作ります。
(1)info.plistに有効なNSUserActivityTypesを定義します。
<key>NSUserActivityTypes</key>
<array>
  <string>wear.multiple.windows.coordinateDetail</string>
</array>
(2)UICollectionViewの場合は「viewDidLoad()」あたりに以下のコードを追加します。
collectionView.dragDelegate = self
(3)UICollectionViewDragDelegateの「collectionView(_:itemsForBeginning:at:)」 で、新しいウィンドウを開くのに必要な情報をNSUserActivityのuserInfoに入れてUIDragItemに渡します。(NSUserActivityのactivityTypeは、先ほどinfo.plistで指定した文字列にすること)
extension ViewController: UICollectionViewDragDelegate {
  public func collectionView(_: UICollectionView, itemsForBeginning _: UIDragSession, at indexPath: IndexPath) -> [UIDragItem] {
    let userActivity = NSUserActivity(activityType: "wear.multiple.windows.coordinateDetail")
    activity.userInfo?["Info"] = items[indexPath.item] //新しいウインドウを開く際に必要な情報をuserInfoに入れる
    let itemProvider = NSItemProvider(object: url)
    itemProvider.registerObject(userActivity, visibility: .all)
    let dragItem = UIDragItem(itemProvider: itemProvider)
    return [dragItem]
  }
}
UITableViewもUITableViewDragDelegateがあるのでほぼUICollectionViewと同じように実装できます。UIButtonやUIViewの場合はUIDragInteractionとUIDragInteractionDelegateを使えば可能です。
ここで1つ注意ですが、NSUserActivityのuserInfoに入れてもよいのは以下のタイプのみで、それ以外はアプリが落ちてしまうので気をつけてください。
Each key and value must be of the following types: NSArray, NSData, NSDate, NSDictionary, NSNull, NSNumber, NSSet, NSString, or NSURL. The system may translate file scheme URLs that refer to iCloud documents to valid file URLs on a continuing device.
(4)SceneDelegate.swiftに新しいウィンドウを開くための処理を追加します。
タブをウィンドウ外にドラッグ&ドロップした際にSceneDelegateの「scene(_:willConnectTo:options:)」が走るので、そこに新しくウィンドウを開く処理を追加すれば実装完了です。
func scene(_ scene: UIScene, willConnectTo session: UISceneSession, options connectionOptions: UIScene.ConnectionOptions) {
  if let userActivity = connectionOptions.userActivities.first {
    if userActivity.activityType == "wear.multiple.windows.coordinateDetail", let info = userActivity.userInfo?["Info"] as? NSString {
      let vc = BrowserViewController.instantiate()
      vc.info = info
      window?.rootViewController = vc
    }
  }
}
その3. ロングタップからのコンテキストメニューから新しいウィンドウを開く
ボタンのタップをきっかけに新しいウィンドウを開く動きを実装したいという需要も多いと思います。この場合も少しのコードで実装できます。
ここでは、UICollectionViewのセルをロングタップしてコンテキストメニューを出し「新しいウィンドウを開く」ボタンを押して開く実装例をご紹介します。

(1)UICollectionViewの長押しをハンドリングしてコンテキストメニューを表示させます。(触覚タッチを使った例)
extension ViewController: UICollectionViewDelegate {
  open override func collectionView(_ collectionView: UICollectionView, contextMenuConfigurationForItemAt indexPath: IndexPath, point _: CGPoint) -> UIContextMenuConfiguration? {
    let actionProvider: ([UIMenuElement]) -> UIMenu? = { _ in
      let openNewWindowAction = UIAction(title: "新しいウインドウで開く", handler: { [unowned self] _ in
        //新しいウインドウを開く処理を
        openNewWindow(indexPath: IndexPath)
      })
      return UIMenu(title: "コンテキストメニュー", image: nil, identifier: nil, children: [openNewWindowAction])
    }
    return UIContextMenuConfiguration(identifier: nil, previewProvider: nil, actionProvider: actionProvider)
  }
}
(2)新しくウィンドウを開くのに必要な情報をNSUserActivityに追加して、UIApplicationの「requestSceneSessionActivation:userActivity:options:errorHandler:」を実行します。
func openNewWindow(indexPath: IndexPath) {
  let activity = NSUserActivity(activityType: "wear.multiple.windows.coordinateDetail")
  activity.userInfo?["Info"] = items[indexPath.item] //新しいウインドウを開く際に必要な情報をuserInfoに入れる
  UIApplication.shared.requestSceneSessionActivation(nil, userActivity: activity, options: nil)
}
(3)UIApplicationの「requestSceneSessionActivation(:userActivity:options:errorHandler:)」を実行するとUISceneDelegateの「scene(:willConnectTo:options:)」が走るので、NSUserActivityから情報を取得し、それを元に画面を生成させます。
func scene(_ scene: UIScene, willConnectTo session: UISceneSession, options connectionOptions: UIScene.ConnectionOptions) {
  if let userActivity = connectionOptions.userActivities.first {
    if userActivity.activityType == "wear.multiple.windows.coordinateDetail", let info = userActivity.userInfo?["Info"] as? NSString {
      let vc = BrowserViewController.instantiate()
      vc.info = info
      window?.rootViewController = vc
    }
  }
}
その4. 以前に開いていたすべてのウィンドウの状態を復帰させる
これで大体のMultiple Windows機能は実装できましたが、今のままだとアプリを閉じてしまったら閉じる前の状態を復旧できず毎回初期値の状態で起動してしまいます。
以下のコードを足すことで以前開いていたウィンドウの状態を復帰できます。
(1)SceneDelegate.swiftに以下のメソッドを追加します。
@available(iOS 13.0, *)
func stateRestorationActivity(for scene: UIScene) -> NSUserActivity? {
  return scene.userActivity
}
(2)ViewControllerにウィンドウの状態を保存したいタイミングに以下のコードを追加します。
let userActivity = NSUserActivity(activityType: "wear.multiple.windows.coordinateDetail")
userActivity.title = webView.title
userActivity.userInfo?["Info"] = info
view.window?.windowScene?.userActivity = userActivity
(3)SceneDelegate.swiftの「scene(_:willConnectTo:options:)」にウィンドウの状態を保存している「session.stateRestorationActivity」から情報を取得するコードを追加します。
func scene(_ scene: UIScene, willConnectTo session: UISceneSession, options connectionOptions: UIScene.ConnectionOptions) {
  if let userActivity = connectionOptions.userActivities.first ?? session.stateRestorationActivity {
    if userActivity.activityType == "wear.multiple.windows.coordinateDetail", let info = userActivity.userInfo?["Info"] as? NSString {
      let vc = BrowserViewController.instantiate()
      vc.info = info
      window?.rootViewController = vc
    }
  }
}
早速、複数のウィンドウを開き一旦閉じてもう一度起動してみましょう。ウィンドウの状態が復帰できます。

その5. 現在開いているすべてのウィンドウのUIを更新する
現在開いているすべてのウィンドウのUIを変更したい場合は当然出てくると思います。例えば、Safariならば新しくブックマークを追加した場合、すべてのウィンドウにそれが反映されますよね。
これまでならViewControllerに付き1つのウィンドウだけ管理しておけば問題ありませんでした。しかし、Multiple Windowsは、同じViewControllerのウィンドウが複数並ぶことになります。アクティブなウィンドウだけが更新されるのはまずいわけですね。
すべてのウィンドウを更新する方法として、Introducing Multiple Windows on iPad と Architecting Your App for Multiple Windowsで「UserDefaultsによるKVOで行う方法」と「NotificationCenterで行う方法」の2つの方法が紹介されていました。
ケースバイケースでどちらの手段を使うか決めましょう。
UserDefaultsを用いたKVOの場合
UserDefaultsを拡張しKVOで値の変更を監視して全ウィンドウを更新する方法です。
(1)KVO用のKeyPathを作るExtensionを用意します。
extension UserDefaults {
  private static let isToolbarHiddenKey = "isToolbarHiddenKey"

  @objc dynamic var isToolbarHidden: Bool {
    get { return bool(forKey: UserDefaults.isToolbarHiddenKey) }
    set { set(newValue, forKey: UserDefaults.isToolbarHiddenKey) }
  }
}
(2)設定画面で、isToolbarHiddenを変更する処理を追加します。
UserDefaults.standard.isToolbarHidden = !sender.isOn
(3)NSKeyValueObservationをインスタンスで保持して、ViewControllerの「viewDidLoad()」に以下のコードを追加します。
private var observer: NSKeyValueObservation?
observer = UserDefaults.standard.observe(\UserDefaults.isToolbarHidden,
                                                 options: .initial,
                                                 changeHandler: { [weak self] (_, _) in
  self?.navigationController?.setToolbarHidden(UserDefaults.standard.isToolbarHidden, animated: true)
})
NotificationCenterの場合
ViewControllerが受け取ったイベントをModelControllerに送り、ModelControllerがModelを更新したら、各ViewControllerに通知してUIを更新する方法です。
(1)イベントを更新した際に通知をPostするデータ型を用意します。
enum UpdateEvent {
  case DeleteFavorite

  static let DeleteFavoriteName = Notification.Name(rawValue: "DeleteFavorite")

  func post() {
    switch self {
    case .DeleteFavorite:
      NotificationCenter.default.post(
        name: UpdateEvent.DeleteFavoriteName,
        object: self
      )
    }
  }
}
(2)ModelControllerのメソッド内で処理を完了際に通知を送信する処理を追加します。
final class ModelController {
  func deleteFavorite() {

    // 削除処理

    let event = UpdateEvent.DeleteFavorite
    event.post()
  }
}
(3)ViewControllerにModelControllerに追加したメソッドを実行する処理を追加します。
extension ViewController {
  private func deleteButtonAction() {
    modelController.deleteFavorite()
  }
}
(4)ViewControllerに通知を受信する処理と通知を受信した際に行う処理を追加します。
extension ViewController {
  private func setupNotification() {
    NotificationCenter.default.addObserver(
      self,
      selector: #selector(reload),
      name: FolderDetail.UpdateEvent.DeleteFavoriteName,
      object: nil
    )
  }
}
@objc private func reload(notification: Notification) {
  // 通知を受け取った際に行いたい処理を追加
}
実行すると、すべてのウィンドウにUIの変更が反映されます。

まとめ
Multiple Windowsは、UIの実装はそれほど難しくないですが、データ保存などの設計をMultiple Windowsありきで考える必要があると感じました。
考えられるケースとしては、AとBのウィンドウで使用しているデータの保存先が同じでそれぞれリアルタイムに更新している場合ですね。
どちらを優先させるのか。またはウィンドウ別に保存させるようにするのか。アプリによってどれが最適なのかを考える必要があり、なかなかすぐに対応するのは難しいのではないかと感じました。
ただ、やはりMultiple Windowsが使えるようになれば使い勝手がとても良くなるのは間違いありません。WEARであれば、コーデの検索画面と詳細画面を一度に確認できたり、お気に入りフォルダの中身を確認しながらコーデを追加できたりと、アプリを巡るスピードが飛躍的に上がりましたので。
最後に、Multiple Windows機能をWEARに仮実装して感じたポイントを3つにまとめました。
- Multiple WindowsのUIの実装はそれほど難しくない。ただし、1つのViewControllerを複数のウィンドウで開くことになるので、UIの更新やデータの保存には注意する必要あり。
- NSUserActivityに必要な情報を渡し、それを用いて新しいウインドウを開く。ただし、NSUserActivityに渡せるタイプは限られているので注意すること。
- AppDelegateのライフサイクルメソッドは使えなくなるので、SceneDelegateのライフサイクルメソッドを用いる必要がある。
この記事がMultiple Windows実装の一助になれば幸いです。
参考
- Introducing Multiple Windows on iPad - WWDC 2019 - Videos - Apple Developer
- Architecting Your App for Multiple Windows - WWDC 2019 - Videos - Apple Developer
- Supporting Multiple Windows on iPad | Apple Developer Documentation
- Multiple Windows - System Capabilities - iOS - Human Interface Guidelines - Apple Developer
さいごに
ZOZOテクノロジーズは、iOSエンジニアを募集しています。ご興味のある方は、以下のリンクからぜひご応募ください!